(Cross) Compiling DCMTK for Android
DCMTK works on many operating systems like Windows, Mac OS and Linux. Since mobile devices become more and more important, it makes sense to also support platforms like Android or iOS. This tutorial explains how to cross-compile DCMTK for Android, using a CMake Android toolchain built into DCMTK in connection with Google's official Android SDK and NDK. The build is supported and tested under Linux, other host platforms may work, too.
Prerequisites
Depending on your host operating system, different external software packages will be required during the compilation process. Independent of the host operating system used, the following software packages are required:- The Android NDK, as it includes the required toolchains and runtime libraries for cross compiling.
- The Android SDK, as it includes the Android device emulator which is used for unit tests.
You can use Android Studio or the standalone SDK. - The CMake build system which is employed by DCMTK to configure the compilation process for Android and for providing the unit test framework.
If your operating system comes with a package manager (e.g. apt on Debian) take a look whether it provides related packages. This will most likely ease the rest of the configuration process.
Linux
Most Linuxes provide all additional requirements by default. Therefore, and since Android and the Android NDK are based on a Linux-based structure, it is probably the recommended host platform in order to cross-compile DCMTK for Android. Therefore it is recommended over Windows.
Other host operating systems
Other host operating systems are currently not officially supported and may or may not work. Microsoft Windows has worked in the past, but currently we have no resources to test if it still works. Unix like systems (e.g. MacOS X) may also work, but are not explicitly supported at the moment.
Setting up the Build Configuration
After installing all required software, you will have to configure the Android SDK and create an emulator configuration for later use. Afterwards you may setup the project build configuration via CMake that will be used during the compilation step.
Configuring the Android device emulator
Make sure to setup the Android SDK as required for being able to run the emulator with an appropriate configuration. See for example this tutorial about the Android SDK for that purpose. Make sure to install the required system images for the API version you are going to use. When that is done create a matching Android Virtual Device (AVD) configuration, for example utilizing the device manager of Android Studio. The configuration may look like shown in figure 1.
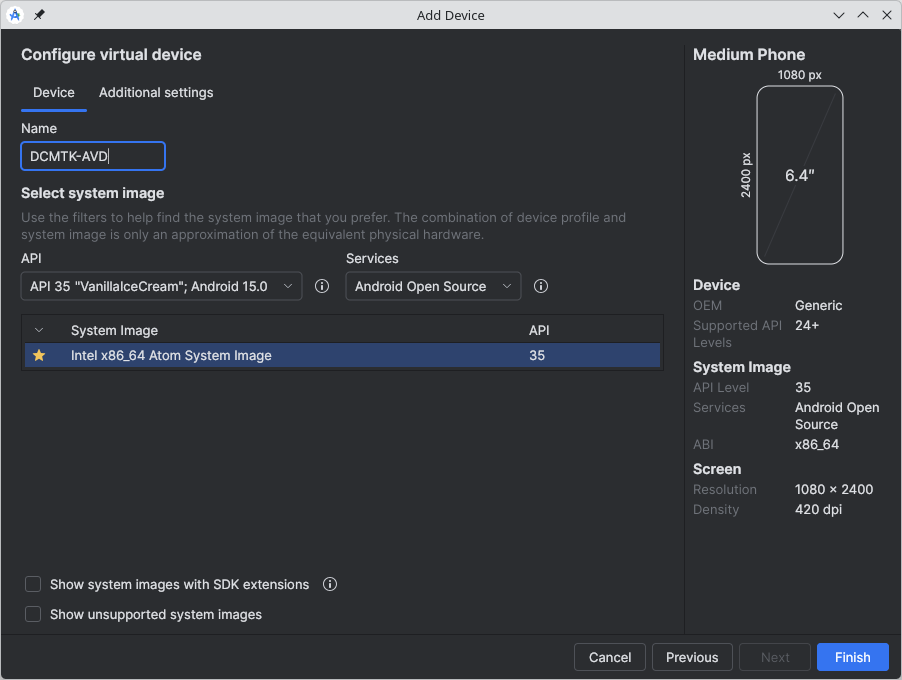
Figure 1: Setting up the Android Virtual Device (AVD) configuration
It should be noted, that for development and testing Android Open Source should be picked under Services.
Setting up the build configuration via CMake
This section describes how the build configuration can be setup with CMake's graphical user interface. This is recommended when doing it for the first time, since it allows to neatly gain an overview about the available configuration parameters and provides an interactive interface which easily guides you around the possible errors in a step-by-step fashion. After you have become comfortable with the relevant parameters (i.e. CMake variables) you may use CMake's command line interface instead of the GUI, but this will not be described in this tutorial as it should be self explanatory once you understood the configuration process.
The first step is to point CMake to the source code and build directories.
Then click on + Add Entry to add an entry for CMake.
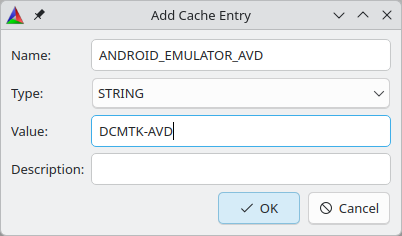
As a name, enter CMAKE_SYSTEM_NAME, Type is String and the value is Android. It should look like this:

Afterwards do the same with the following entries:

The Android System version to use.
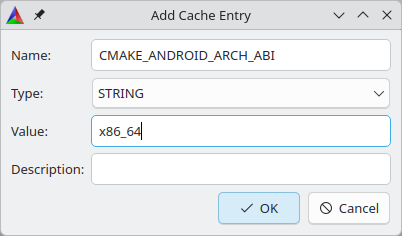
The architecture to use, newer Androids only support x86_64.
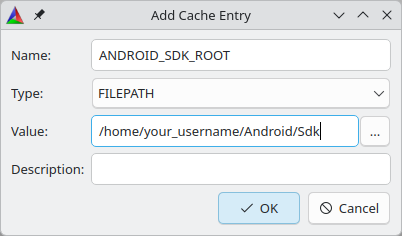
If you have used Android Studio, the Android SDK should be installed in your home directory. Otherwise it could be somewhere else.
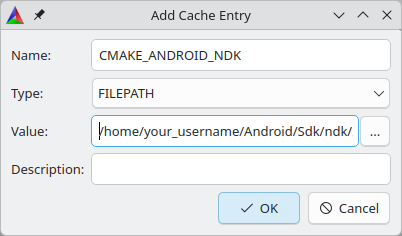
The Android NDK ist also in your Android SDK directory. If it ist not, you should download it via SDK Manager in Android Studio.
The Android Virtual Device. In this example we use the AVD we created above.
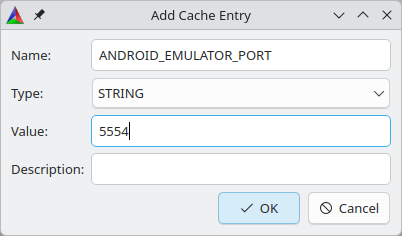
The emulator port range ist from 5554 to 5682.
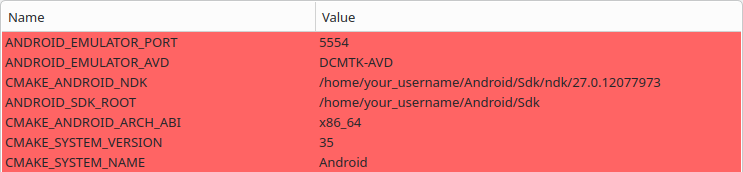
Please note, that all these entries are examples. The file paths will have to be adjusted and the Android version can also be different.
In the end it should look similar to this:
Afterwards hit the configure button. Select Unix Makefiles on a Unix-like host operating system. Choose Use default native compilers and hit the Finish button.
- ANDROID_AVDMANAGER_PROGRAM - location of the
avdmanagerprogram within your SDK. - ANDROID_ADB_PROGRAM - location of the
adbprogram within your SDK. - ANDROID_EMULATOR_PROGRAM - location of the
emulatorprogram within your SDK.
Hit Configure again after changing any of these variables, to have CMake reevaluate the changes.
- ANDROID_TEMPORARY_FILES_LOCATION - the location on the target device that is used for storing temporary files. Defaults to "/data/local/cache" and needs to be changed if you don't have write access to that location on your target device.
- ANDROID_STL_SHARED_OBJECT - this should point to the the C++ standard library implementation shared object on the host system (part of the NDK), which needs to be copied to the target device, as the created binaries depend on it. CMake will search for a file named like specified within
ANDROID_STLand most likely figure it out itself. If not, please select the file manually (only required when using the shared C++ standard library, otherwise ANDROID_STL_SHARED_OBJECT-NOTFOUND is fine, too). - CMAKE_ANDROID_NDK_TOOLCHAIN_VERSION - Since NDK version r19 and above, this variable must be unset or set to
clang. If not specified, the default will be a value that selects the latest available GCC toolchain.
Other configuration parameters of DCMTK
Several additional parameters exist to control DCMTK's configuration. Have a look at this page for more information about the available options. One variable might be particularly important when targeting a mobile device with limited storage capacity:- BUILD_SHARED_LIBS - when enabled, this variable tells CMake to create shared objects instead of static libraries for each of the libraries DCMTK consists of. This has a similar effect like using the shared version of the C++ standard library (see above), i.e. helps reducing the individual binary's file sizes.
Generating the build configuration
After you configured all of DCMTK's settings as desired, you may finally run the configure process by hitting the Configure button again. This will start the Android device emulator with the configured AVD and run several configuration tests.
When CMake is done running compiler-only configure tests, it will wait until the emulator becomes accessible and then transmit some files to the device (to the location specified as ANDROID_TEMPORARY_FILES_LOCATION). It will then run some configuration tests directly on the emulated device and download the results to the local configuration.
Hit Generate when everything is done, this will create the build scripts and configuration files in the configured format (Unix Makefiles).
Using the command line
If you want to build the DCMTK without the CMake-GUI, you can use the command line interface of the operating system directly. For that to work, chage directory to where you want the binary files to be built. This would be the same directory as the CMake-GUI option Where to build the binaries: in the CMake-GUI. Then, enter the following command:cmake -G "Unix Makefiles" -DCMAKE_BUILD_TYPE:STRING=RELEASE -DCMAKE_SYSTEM_NAME:STRING=Android -DCMAKE_SYSTEM_VERSION:STRING=35 -DCMAKE_ANDROID_ARCH_ABI:STRING=x86_64 -DANDROID_SDK_ROOT:FILEPATH=/home/your_username/Android/Sdk -DCMAKE_ANDROID_NDK:FILEPATH=/home/your_username/Android/Sdk/ndk/27.0.12077973 -DANDROID_EMULATOR_AVD:STRING="DCMTK-AVD" -DANDROID_EMULATOR_PORT:STRING="5554" /path/to/dcmtk/source/directory
Most of these options should look familiar. For the command line, you prepend the options with "-D". CMAKE_BUILD_TYPE can also be Debug for debug builds. Make sure to adjust the paths for your system. If you want, you can omit the ":STRING" and ":FILEPATH" part, CMake should be able to handle it nevertheless.
After this command, you can directly enter make to start compiling (Provided there were no errors).
Building DCMTK
Building the DCMTK is done employing the build scripts generated during the previous step. Start the appropriate command shell (most likely a terminal emulator under Linux) and navigate to your build directory. Then type make: This will initiate the build process and create the libraries and modules DCMTK consists of with the configured settings from the previous steps. You may use make -jX where X is the number of build processes to run simultaneously, to decrease the build duration. You may also build individual components only, for example make dcmdata to only build DCMDATA and the libraries it depends on. Run make help to print a list of available build targets.
Running the unit tests
After building the DCMTK was successful, you may run the included unit tests to verify DCMTK works as expected at the configured settings (e.g. ANDROID_NATIVE_API_LEVEL, ...). You can achieve that by running make test or ctest. This will upload the unit tests and all dependent libraries (including anything specified as "ANDROID_STL_SHARED_OBJECT") to the emulated device. Afterwards all the testcase will be run and the results will be downloaded from the device and analyzed.
You may run ctest -R <testcase-name> to run individual testcases only, for example ctest -R ofstd_thread to test if the threading implementation works as expected.
Installing DCMTK
You may install the created binaries and include files by running make install. The install location will be the path specified as CMAKE_INSTALL_PREFIX, which defaults to the appropriate location inside your Android NDK. On the one hand this is convenient since it will allow your projects to use the DCMTK as if it was part of the NDK. But on the other hand running make install may require a privileged user account (for write access to the install directory). Another drawback is that you end up with a "dirty" NDK directory when proceeding this way. In the end it is up to you to decide the install location and if you want to run the install step at all, or maybe just use the binaries from the build directory directly.