CMake Configuration Options
When preparing to compile DCMTK with CMake, some configuration options are displayed. If it all looks complicated, don't worry, it is not :-) This gives a short overview, how CMake configuration works and what the options are good for. Screenshots are from Windows (XP) -- traditionally this the system we get most support requests for...
This document describes CMake configuration with features available in DCMTK 3.6.0. There is also a page referring to the latest source code version.
Introduction
Note that CMake itself does not compile the DCMTK, but is used to generate project files (e.g. Visual Studio under Windows, Makefiles under Unix, XCode under Mac OS X) that can then be utilized for starting the compile process. In order to tell the compiler within the project files what it actually should do and how it should be configured, most of the work is already done in the CMakeLists.txt files that come with DCMTK and that you do not have to worry about.
However, you have some options to influence the compiler and the DCMTK compilation process. If you are not really interested in special features, you just can use the standard settings and ignore the extra settings. If not, read the explanations below.
Pre-Configuration
This is how the CMake dialogue looks like after you start CMake (cmake-gui) initially.
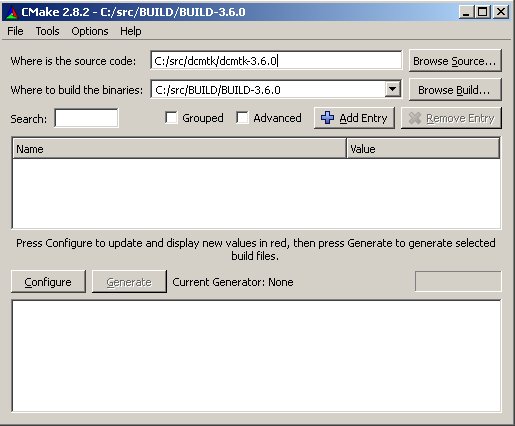
- "Where is the source code": Here you enter the directory, where the source code of DCMTK is residing on your hard disk. Please note that CMake also supports slashes on windows (not only backslash).
- "Where to build the binaries": Here the directory is entered, where CMake will generate the project file that can then used to actually compile the DCMTK. When you start compilation later, all intermediate and result files (binaries) will go there later, too. It does not mean that you install DCMTK to that directory. That can be determined by another setting, below.
Now, hit configure.
Type of project file
CMake will ask you now, which type of project file should be generated; the list offered may be different in different CMake versions, and on different operating systems.
Windows
On Windows, most people go for "Visual Studio" in some variant. DCMTK works with everything starting from Visual Studio 6 to Visual Studio 2010. Be sure that you actually have the version installed that you select! Otherwise CMake will look for the compiler later to test your settings, and then will report a failure. You can download a free version of Visual Studio that is totally sufficient to compile DCMTK. See Microsoft's Visual Studio page for download (go for the C++ variant). Note that for Visual Studio 6 (VC6 compiler) you need to adapt the C++ file extensions!.
NMake command line compilation
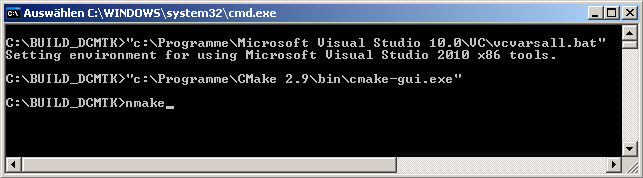
It is also possible to generate NMake Makefiles on Windows. These use the Microsoft Visual Studio compilers (so, you need to have them installed), but you then can start compilation from the commandline interface without the need of starting the Visual Studio GUI. Before starting cmake-gui.exe (and later use nmake to start compiling) you must assure that the compiler is in the path. The easiest way to do this is open a dos box (cmd.exe) and then do as shown in the screenshot below.
Unix-like systems
On Unix, you should select Unix Makefiles. That will permit you to compile DCMTK later by calling "make" from the unix command line. Also, you may be offered to generate KDevelop project files. That may also work, but we did not give it a try so far.
Mac OS X
If you build on Mac OS X, you may either select Unix Makefiles since Mac OS X is also a Unix-based system. However, also selecting XCode works, which is the standard development GUI from Apple. Whatever you choose, DCMTK should build fine with both options.
The fast way
If you are not interested in any details and just want to build DCMTK with all the standard options, you can hit the Configure again, and, if it runs successful, hit Generate. Then you have a project file in the build directory that you have chosen at the beginning and therefore, your task with CMake is completed here.
If you are interested tweaking DCMTK's build configuration, then continue reading.
Prominent Configuration Options
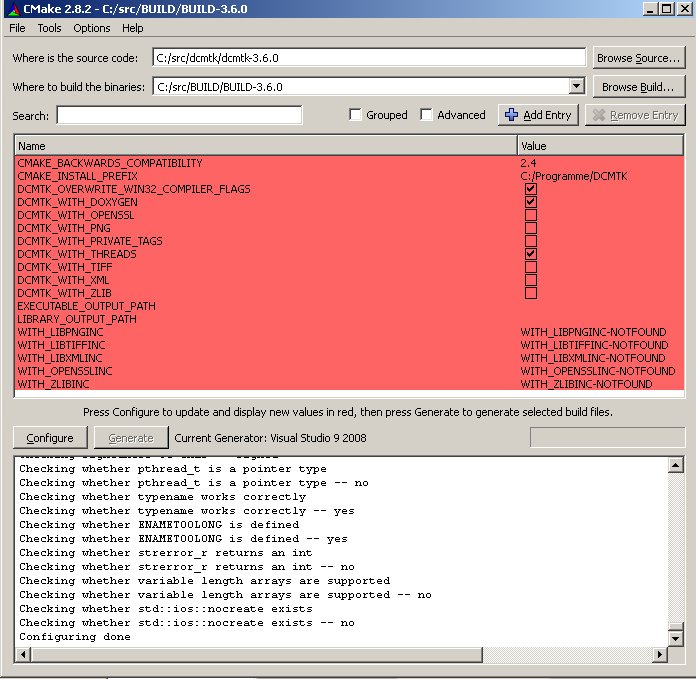
For now, ignore "Search, Grouped and Advanced". Let's start with the rows coloured in red in the screenshot above being the most important configuration options for compiling DCMTK.
- CMAKE_BACKWARDS_COMPATIBILITY: This is the minimum version of CMake that must be used to build CMake. If your use an earlier version, an error is reported if you try to generate a project file.
- CMAKE_INSTALL_PREFIX: This denotes, where DCMTK should be installed later on. Depending on the operating system, the default is different here. You can enter your own path. Please note that DCMTK is not installed by CMake directly, but only if you tell your build system to do that explicitly later on, i.e. you can start installation from Visual Studio, for example.
- DCMTK_OVERWRITE_WIN32_COMPILER_FLAGS: This is only interesting if you are going to compile with Visual Studio on Windows. The DCMTK CMake default configuration sets compiler flags that are known to work on windows systems. However, if you are an expert, you may want to set the compiler flags yourself. If so, you must unselect this checkbox. Only do so, if you know what you are doing!
- DCMTK_WITH_DOXYGEN: The DCMTK API documentation is automatically extracted and generated from the DCMTK source code. For that purpose, the freely available tool doxygen is used. If CMake did find this tool on your system, the checkbox is enabled, i.e. the HTML API documentation will be possible to build. If not, the checkbox is off. If you are sure you have doxygen on your system, you can manually enter the path to the doxygen.exe executable there.
Third party libraries
DCMTK is working fine without any third party libraries. However, if they are not available, some tools will miss some extended functionality, and other will not do something useful at all (and tell you they won't if you try). You can get pre-compiled versions of DCMTK' third party libraries for Windows from the DCMTK website (look for "support libraries"). For other systems, they can be installed separately or you can compile them yourself.
The following libraries might be utilized by DCMTK:- OpenSSL
- libpng
- libtiff
- libxml
- zlib
- DCMTK_WITH_XXX (where XXX is OPENSSL, LIBPNG, LIBTIFF, LIBXML or ZLIB): Disables or enables the very support libray. Depending on whether CMake found the library on your system itself, is enabled or disabled by default.
- WITH_XXXINC (where XXX is OPENSSL, PNG, TIFF, XML or ZLIB): If CMake found the libary on your system, the path to the library's include files is displayed here. If it says WITH_XXXINC-NOTFOUND instead, you can enter the path yourself. If you do, also check the DCMTK_WITH_XXX in order enable the library for compiling.
If you change any include paths and press configure again to take over the changes, CMake might automatically print and error message and disable the DCMTK_WITH_XXX library again if it does not find the library at the location you specified manually.
Private Tags
To enable some pre-configured private tags in DCMTK's electronic version of the DICOM dictionary, the checkbox DCMTK_WITH_PRIVATE_TAGS can be enabled. Note that this only means that some known private tags from different companies can be understood then by DCMTK per default, i.e. DCMTK knows for, which data type (VR) they have and can list their name when using for example dcmdump. However, any unknown private tags will not prohibit you to parse and process the corresponding DICOM file. You may just not be able to understand their value, since DCMTK then only lists them as "Unknown Tag and Value", displays their binary content in dcmdump, and then continues with the next tag.
Of course it is possible to add private tags to DCMTK after compiling. This makes sense for example, if you have to cope with files from a new system in your institution where you know the name, data type and meaning of any private tags from the Conformance Statement of the system, or for any other reason. To add private tags later, just add them to the dicom dictionary text file, e.g. dicom.dic or private.dic (you can also use multiple of them).
So, enabling or disabling this checkbox is a matter of taste. If you are highly intested in the private tags that DCMTK ships with, enable it, otherwise keep it off. The only backdraw of enabling it is maybe a very very tiny performance loss in case you search for tags in the dictionary (which is done in some application fairly often).
Threads
DCMTK has its own cross-platform, thread-related classes, e.g. for Semaphores (OFSemaphore), Mutex (OFMutex) and so on. Those classes can be enabled or disabled as desired by checking/unchecking DCMTK_WITH_THREADS. DCMTK works without any problems if you disable it. If you want to use the thread classes, enable this checkbox.
Please note that if you disable threads but use threads in your own DCMTK-related programs, that may lead to problems then. For example, some global objects in DCMTK are protected by mutexes, for instance the data dictionary cannot be accessed by multiple threads for writing. That's why a mutex takes care of only permitting a single thread to access the dictionary for writing at a time. As a result: Do not disable threads in DCMTK if you want to access classes from DCMTK with multiple threads at the same time.
Also, it may be worth noting that the networking module of DCMTK is not officially thread-safe although some users reported it works well for them with very minor adoptions.
Executable/Library Output Path
The variable EXECUTABLE_OUTPUT_PATH is a pre-defined CMake variable and determins, where all the executables are stored after succesfully compiling them. You might change this; however, you are safe just keeping it as is. Note this is totally different from the path where the files are installed which is controlled by CMAKE_INSTALL_PREFIX. In later versions of CMake (>=2.6), this variable will be replaced by RUNTIME_OUTPUT_DIRECTORY.
The same applies to LIBRARY_OUTPUT_PATH; this is deprecated in later CMake versions (>=2.6) and the use of ARCHIVE_OUTPUT_DIRECTORY, LIBRARY_OUTPUT_PATH, and "RUNTIME_OUTPUT_DIRECTORY" is encouraged instead. Again, best is just to leave those variables alone unless you know what you are doing.